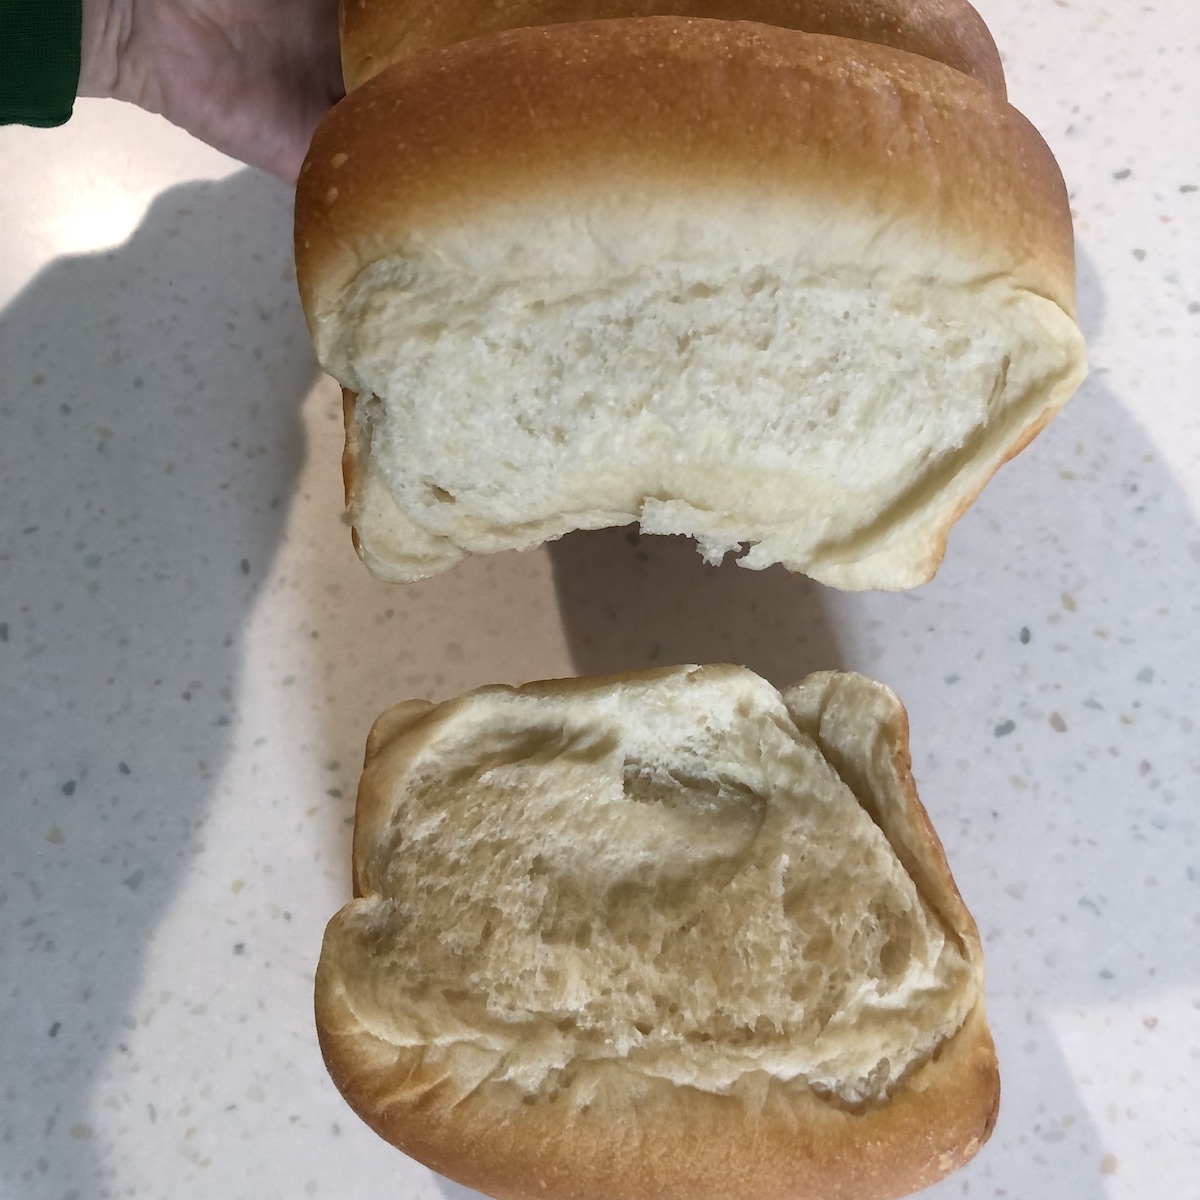
Vegan Milk Bread has AMAZING soft texture, slight sweetness and delicate crumb. The nearest commercial comparison is a Hawaiian roll. In addition this bread uses a special technique to extend its shelf life, tangzhong.

What is Tangzhong?
Tangzhong is a process that pre-cooks a small amount of the liquid and flour. This gelatinizes the starch in the flour. It helps the bread stay fresh longer at room temperature, and tenderizes the bread by retaining moisture. It takes just a few minutes but totally changes the bread.
Tangzhong is a Japanese technique. A slightly different technique is used in China and Korea to make milk bread.
Asian milk bread is normally made with milk, egg, butter and dried milk. So how does a vegan or someone with milk or dairy allergies or intolerances enjoy milk bread? I tested and experimented to give you a delicious, foolproof vegan milk bread recipe.
My breadmaking history / background
I have made all my family’s breads for more than 30 years. About 20 years ago when my husband started avoiding soy, I had trouble finding hot dog buns or hamburger buns without soy. So I started making hot dog and hamburger buns. When I heard that sourdough might make wheat easier to digest, I began making long fermented sourdough – and I have never looked back. It is our beloved everyday bread.
Why am I telling you all this? I am a home cook just like you. I don’t have a fancy oven to produce steam. I am trying to help my family eat healthy. I am an experienced bread baker, so I can guide you through this process. I tested MANY modifidcations and loaves of bread so you can have success. If you have not made much bread, it may take a time or two before your bread is just like mine. I will share my tips and tricks with you to make it easier.
My first tip is King Arthur Baking Company. Not only do they make the best American grown flour and have a wealth of wonderful recipes on their website, but they have a team of bakers who are ready to help you if you need it. However even with them pointing you in the right direction, you still have to experiment. But for vegan miik bread, I did all the experimenting for you!! It is SO good, it is worth the effort!
Experimenting to make it vegan –
Making it dairy free
Oil for butter
This was the easiest substitution. But instead of using a straight substitution, the same number of tablespoons, use the same amount of fat. Butter has 11 grams of fat per tablespoon. Oil has 14 grams of fat per tablespoon. So 4 tablespoons of butter in the recipe became 3 tablespoons of oil. I used canola oil, but you can use whatever mild oil you tolerate.
Milk
From all my research I knew that whole milk worked best in Asian milk bread recipes. Whole milk is high in both fat and protein. The most obvious substitution is soy milk. It contains the same amount of protein per cup as whole milk – 8 grams. However we do not consume soy in my house. And the dairy free milk I purchased in the past had only 2 grams of fat and protein per cup.
I found three promising nut milks – pistachio, cashew and high fat almond. (If you are nut allergic I tested an oat milk too – keep reading!)
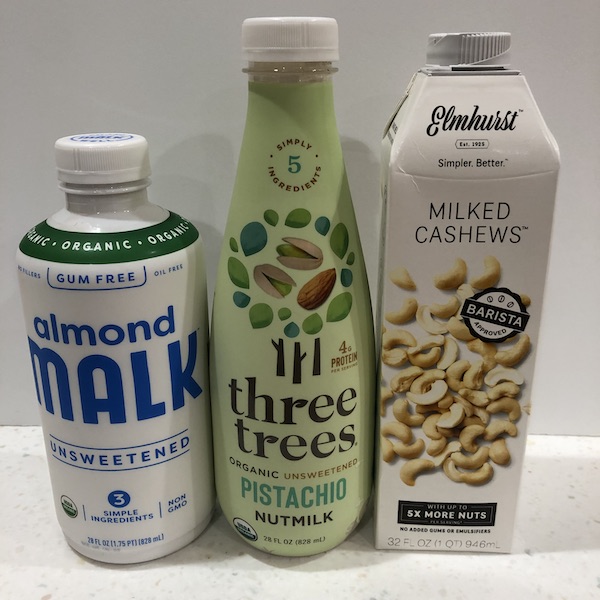
All of them had 8-9 grams of fat per cup. And ALL of them worked beautifully. And you could not tell the difference between them. So I think that whatever high fat nut milk you can find, it should work. (Soy should work also – I did not try it.)
What about Oat Milk?
For those of you who avoid nuts, I have good news. With a few adjustments, my favorite brand of oat milk worked. Oat milk is significantly lower in fat than nut milk (some almond milk is also lower in fat) so I increased the oil in the recipe from 3 tablespoons to 4. It worked! I have only tried oat milk but I bet it will work with most any lower fat milk. Just add another tablespoon of oil to the bread.
High fat nut milk is my first recommendation, but lower fat milk works also with additional oil.
Potato Flour for Dried Milk
Dried milk adds tenderness to a loaf of bread. I turned to another moisture enhancer in bread – potato flour. It worked like a charm! It will also help keep your bread fresh at room temperature. Keep potato flour in your freezer and it will last a very long time.
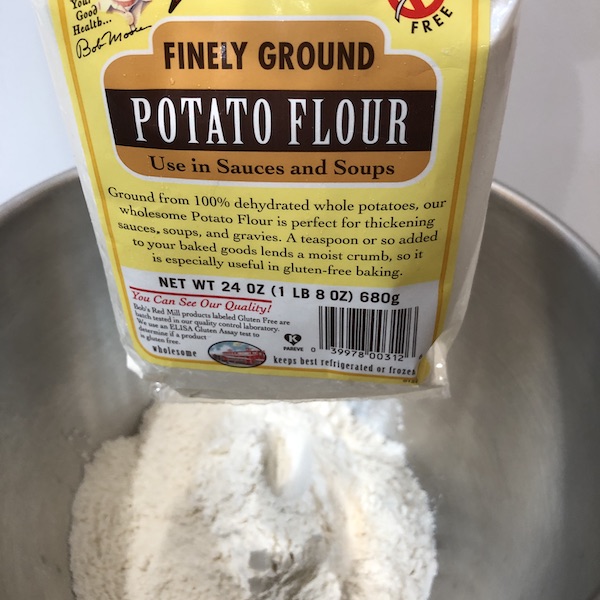
For those of you who avoid potatoes, I also tried tapioca starch. This bread was fine when it was first baked, but it did not stay as fresh on the counter. So it works, but just plan to keep it on the counter for only a day or two.
Potato Starch?
Can you substitute potato starch for potato flour? The short answer is I did not try it. However it is more like tapioca starch than potato flour which contains protein and fiber while the potato starch is just washed starch (like tapioca or corn). So I would use potato flour or even dehydrated potato flakes in this recipe unless you will freeze the bread quickly. The same goes for corn or any other starch in place of the potato flour.
Eggs
I used both flax eggs, and two kinds of aquafaba (garbanzo bean and white bean.) The quick answer is that all worked just fine.
Aquafaba
Aquafaba is the liquid drained from a can of beans (try this recipe to use up the beans!). There did not seem to be any difference between the aquafaba drained from chick peas or white beans. They performed identically in the bread with different nut milks.

Aquafaba stores well for up to a week in the refrigerator. Just be sure to stir the aquafaba before you measure it as the bean solids will settle.
Flax Eggs
One tablespoon ground flax combined with three tablespoons of water in a small bowl will form a loose gel and can be substituted for one egg. It worked just fine in this recipe.
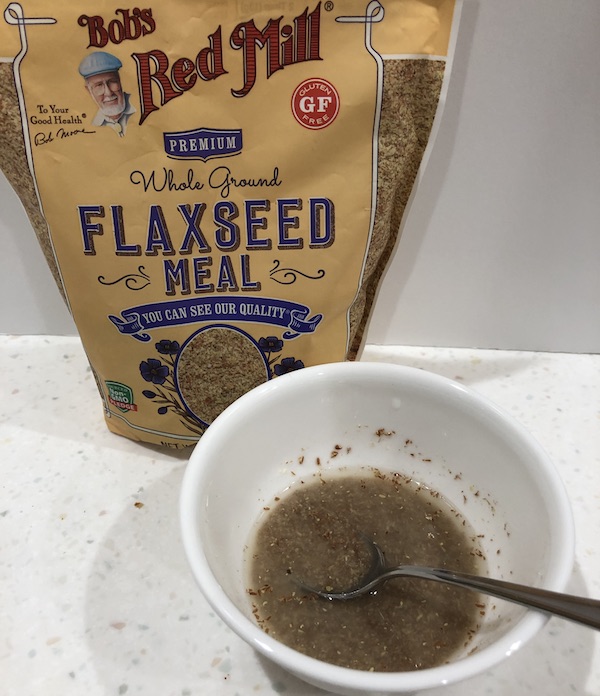
The bread with flax eggs will have specks. They are medium brown and added a speckled look to your loaf (or hamburger buns).
Flax Eggs or Aquafaba – Which to Use??
If either flax or beans are an option in your household, here are a couple of reasons you might choose one or the other:
Sensitive Nose
My daughter noticed a mild smell with one of the aquafabas. There is NO difference in taste, but for sensitive noses, try a flax egg.
What are these flecks?
If you have kids who are opposed to whole grains, or flecks, don’t use a flax egg. You will see small brown flecks in your bread.
Watching your sodium?
Aquafaba has more (remember the recommendation to drain and rinse your canned beans to remove up to 40% of the sodium?)
Omega 3s
Flax eggs add omega 3s to your bread. However because there is only one tablespoon in a loaf of bread, only a small amount is added. Be sure to store the ground flaxseed in your freezer to preserve the omega 3 fats.
Convenience
I always have ground flax seed in my freezer. I don’t always want to open a can of white beans. In some recipes the few extra minutes to make a flax egg might make a difference, but in this one, you are going to make the tangzhong anyway so the time is not a factor.
Ingredients
Bread Flour – Bread flour is important here as it contains more protein which is essential for this “enriched” (with egg & sweetener) dough. I recommend King Arthur Flour bread flour at 12.7% protein. King Arthur has a smaller range of acceptable levels of protein which means you get a more consistent result.
High Fat Nut Milk – see notes above for using oat milk or another lower fat milk
Potato Flour – (you will thank me later!)
Ground Flax Seed or Aquafaba drained from a can of legumes
Oil
Sugar
Salt
instant Yeast – other types of yeast that need proofing have NOT been tested in this recipe
Equipment
Scale – One of the secrets of success in this recipe is to weigh your ingredients. You can purchase a scale with a tare function for $20 online. (A tare function allows you to add ingredients sequentially.) It will be well worth it – in all your baking!
Stand Mixer or Bread Machine. This is not totally necessary but I understand without one, your arms will get a good workout. I used my stand mixer once. It worked just fine. But my bread machine was the real star of the show and after I found out the stand mixer worked, I used my Zojurishi on the dough cycle. My bread came out risen and ready to divide and roll. And a couple of times I was not able to get to it right away, it rose longer and was fine!
Rolling Pin
Bread Pan – I used an inexpensive 9×5 loaf pan and a longer pan for cinnamon bread.
Instant Read Thermometer (if you don’t have one – splurge! How are you cooking your meat without one?)
Whisk
Small Saucepan
Heat Proof Silicone Spatula
Ruler
Bench Knife (optional but helpful for dividing dough) a sharp or serrated knife works as well
Aluminum Foil For Tenting
Method / Preparation
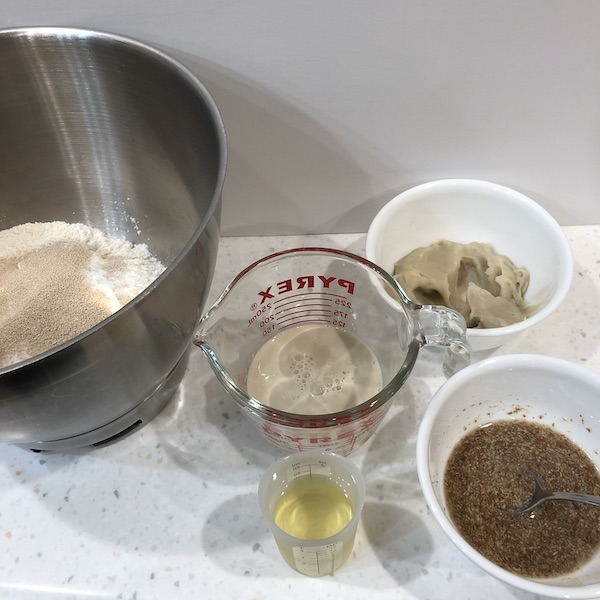
If you are using flax eggs, place a tablespoon of ground flax in a small bowl with three tablespoons of water. Stir well. As you pass the bowl while prepping other ingredients, stir the flax egg. Let it sit at least 15 minutes.
Making the Tangzhong
Place 43 grams high fat non dairy milk (3 T), 43 grams water (3T) and 14 grams bread flour (2T) in a small saucepan. Whisk thoroughly but do not worry too much if a few flour lumps remain.
Heat over low heat whisking constantly. I use a heat proof silicone spatula to scrape around the sides of the bottom of the pan. Stir until the flour gelatinizes and forms a paste. Your whisk should leave clear streaks in the bottom of the pan. On my gas stove this takes just about 2 minutes. If you have an electric stove, it may take up to 5 minutes.
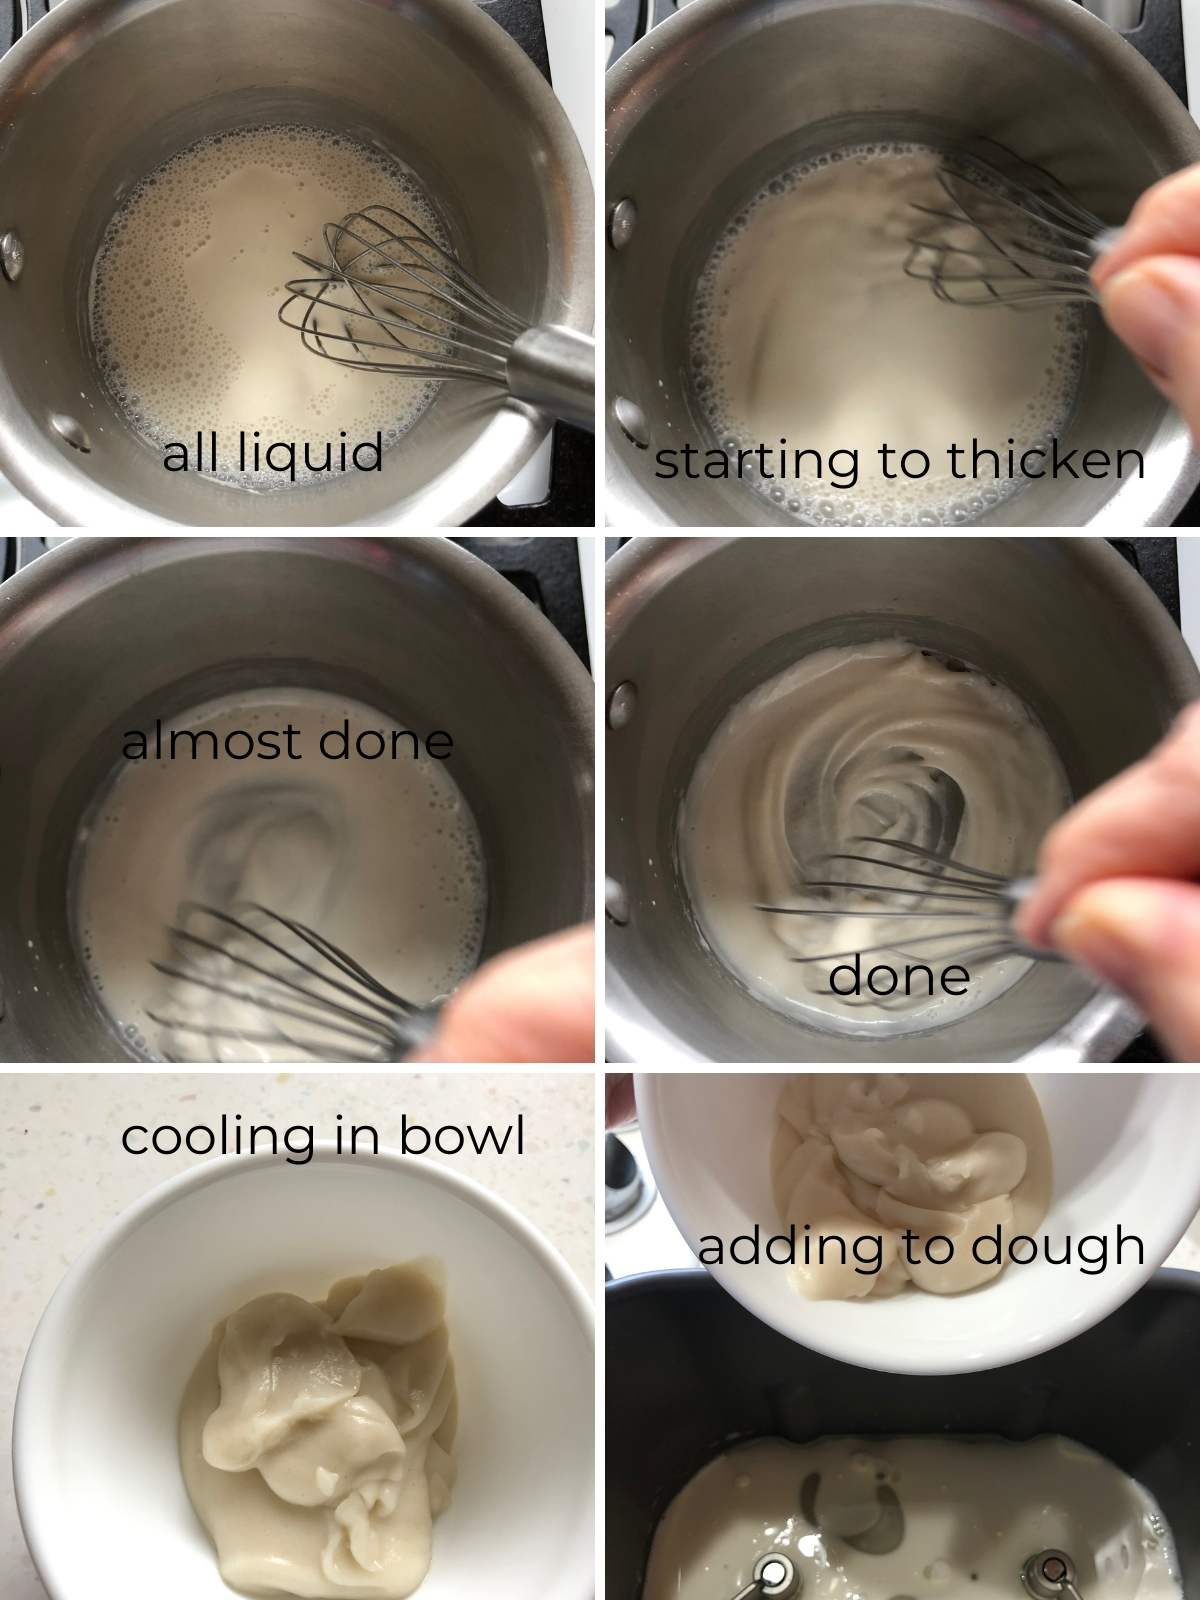
As soon as the paste has formed, remove the pan from the heat. Scrape the Tangzhong into a small bowl to cool.
Hint: Every time I tried to add the flour to the water and milk in the pan I would put in too much flour and have to try to scoop it out. Finally I weighed the flour separately a small bowl. I then used this small bowl to put the cooked tangzhong to cool.
As your tangzhong cools, gather your other ingredients, stirring the flax egg occasionally.
If you are using a bread machine, be sure to place the ingredients in the pan in the order specified by the manufacturer. This is essential for success.
If you are using a stand mixer, combine the remaining non dairy milk, oil, sugar, salt, tangzhong and egg substitute in the mixing bowl. Using a dough hook, mix well, starting on low setting to combine. Add the flour, potato flour and yeast. Knead on medium low speed until a smooth elastic dough forms – about 5-10 minutes.
The dough should be a little sticky but hold together around your dough hook. If the dough is not soft, but rather stiff and is not at all sticky, add another tablespoon of milk. If it is not coming together but is messy all over the side of the mixing bowl – not just at the bottom- add another tablespoon of flour. Be patient and give it a few minutes to come together. If you have weighed your ingredients, it is less likely you will have to add liquid or flour, but you might. At different times of the year, flour absorbs different amounts of moisture accounting for different results.
When your dough is complete, let it rest covered for 60-90 minutes. It will be puffy but it may or may not double in bulk.
Shaping the Dough
Place the dough on a floured surface.
To make traditional Japanese milk bread (Hokkaido), divide into four equal pieces. They should weigh 160-170 grams each.
On a very lightly floured surface, roll out one piece of dough into a rectangle about 8 inches by 5 inches (mine always end up a little bigger and it is just fine!)
Fold the dough like a letter – one third into the middle and the other side over the first and set aside. Repeat with the remaining three pieces of dough.
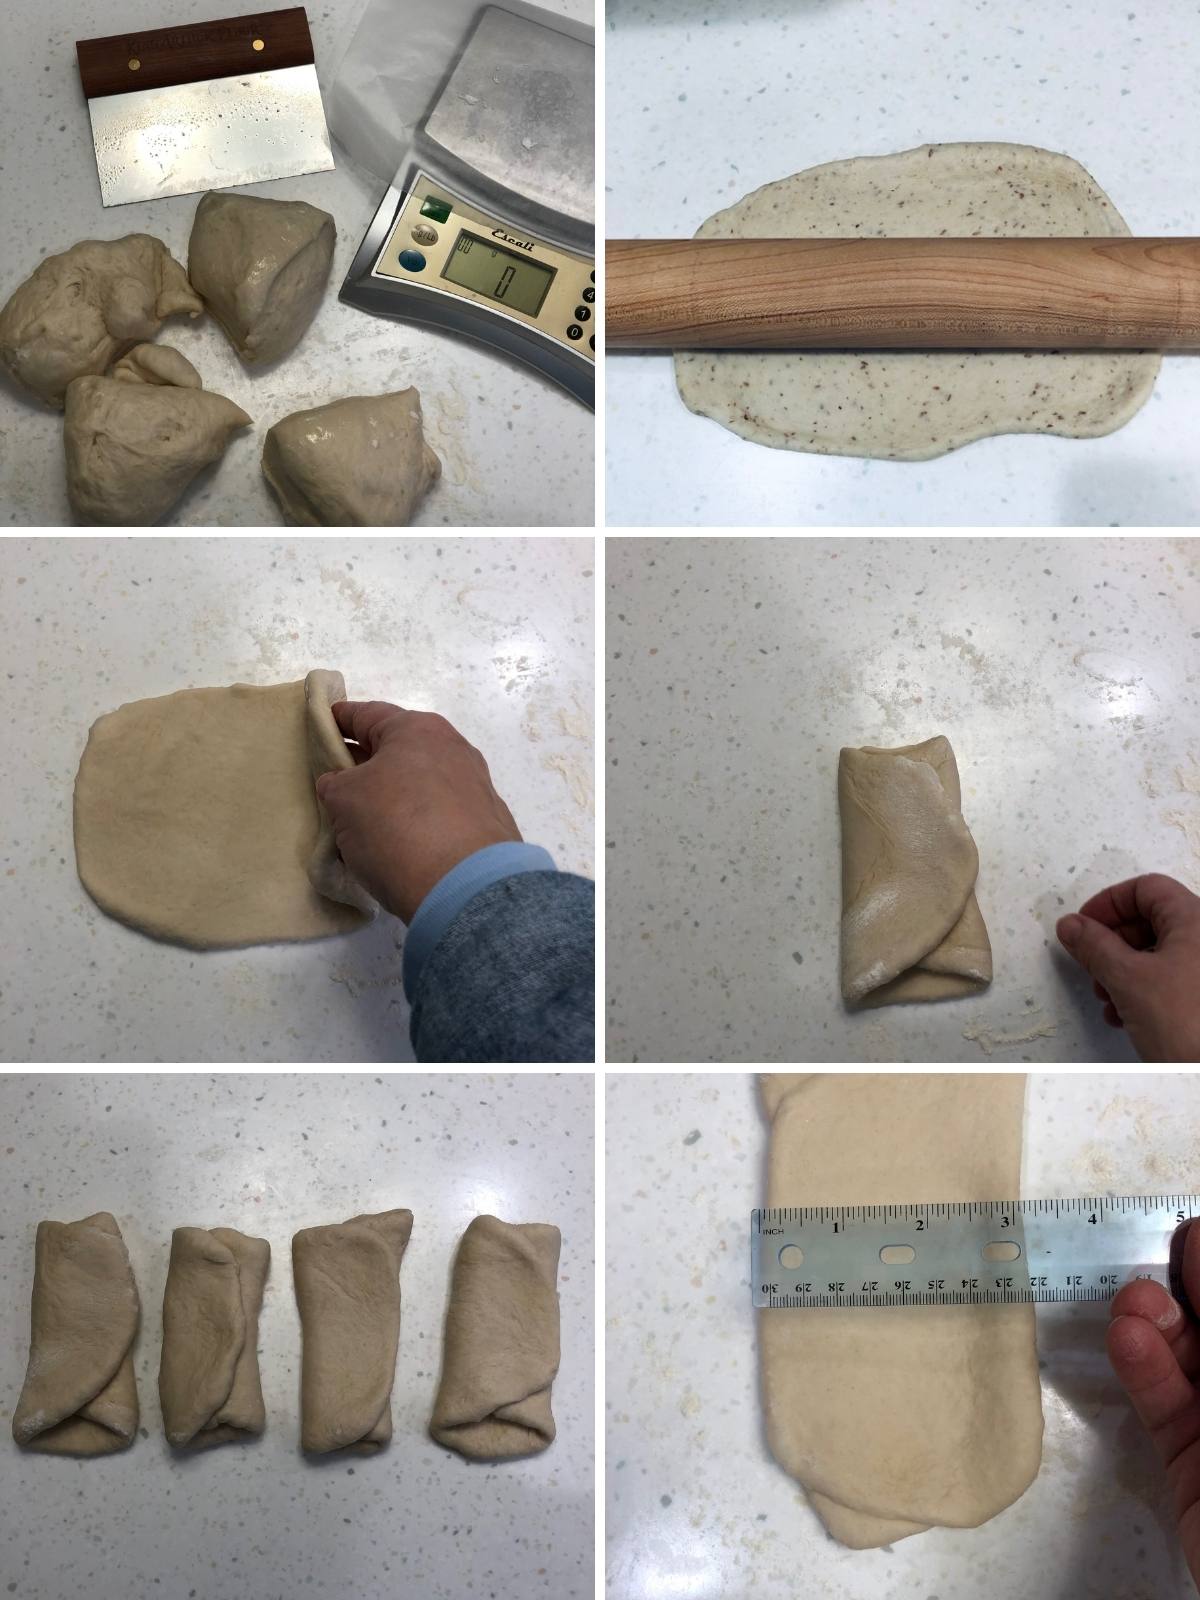
Take the first piece of dough and on a lightly floured surface roll into a rectangle smaller than the first – about 3 x 6 inches. Starting with a short end, roll up the dough. Repeat with the remaining three pieces of dough.
Place the dough into a lightly greased bread pan. Cover with plastic wrap and let sit at room temperature for 20 minutes. Preheat oven to 350 degrees. Set a timer for another 20 minutes. After 20 minutes, see if the dough has risen up to the edge of the pan. If so, it is ready to bake. If not, wait 10 more minutes.
Baking the Bread
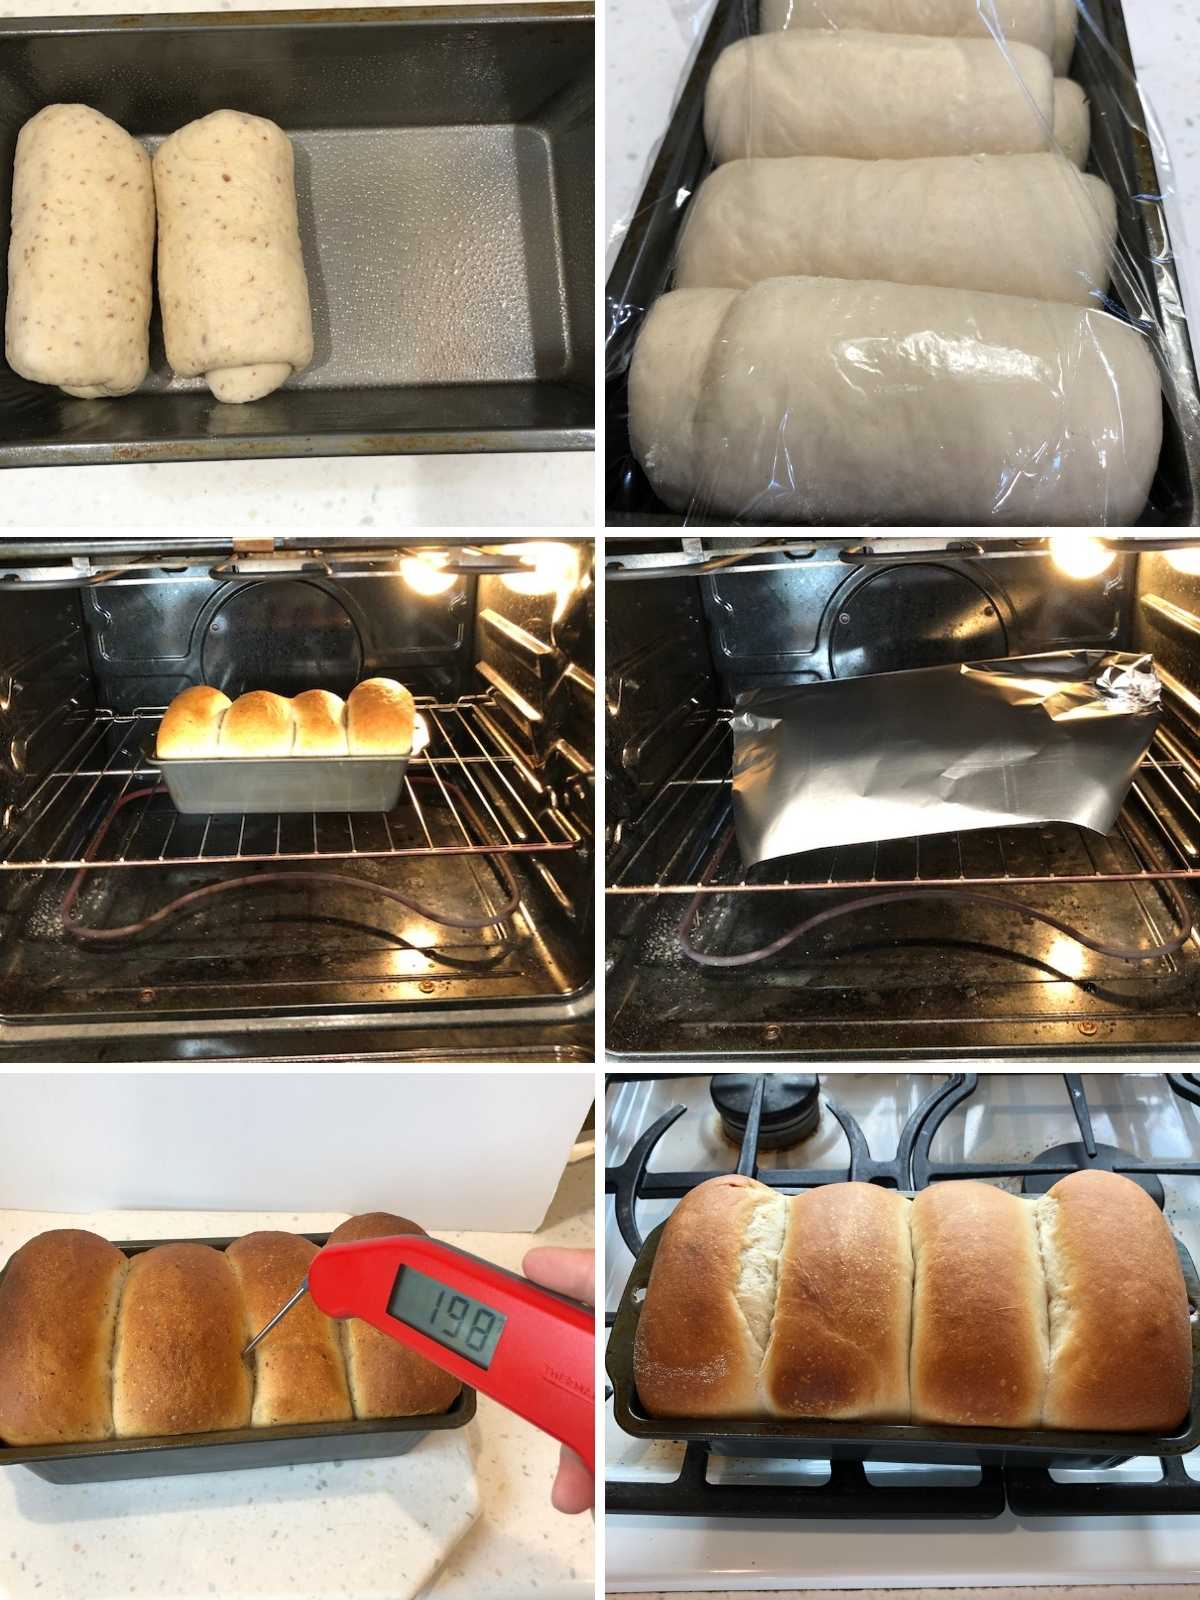
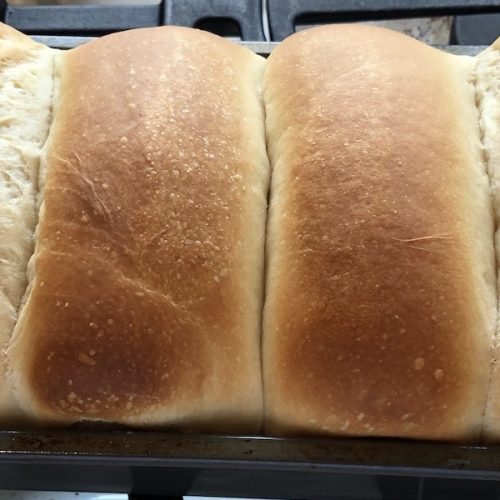
Bake in a 350 degree oven for 20 minutes. Turn the loaf pan 180 degrees and tent it with aluminum foil to prevent it getting too brown. If you are using aquafaba, the dough tends to brown more quickly so tent after 15 minutes.
After 30 minutes (The first time you make it, check after 25 minutes) the bread should be brown and register at least 190 when a digital thermometer is inserted in the middle.
Untent and take the bread out of the oven placing on a cooling rack. After 5-10 minutes, run a knife around the edge of the pan to loosen and remove from pan. Place on rack to cook completely.
It is VERY tempting to cut into the bread hot. Cutting immediately tends to result in gummy bread so resist! Wait until the bread it cool to slice it. (If you really cannot wait, the four sections can be pulled apart. Pull off the end section and slice it into short slices.
When cool, wrap the bread in plastic. Store well wrapped up to 5 days on the counter. Freeze for longer storage. (But we have found it tastes best eaten the day it is baked or the next day!!)
What if I want to bake it in the morning?
Immediately after shaping, place the pan with bread dough covered with plastic wrap in the refrigerator overnight. In the morning while you preheat the oven, let the bread sit on the counter. Bake as directed.
What else can I do with this dough?
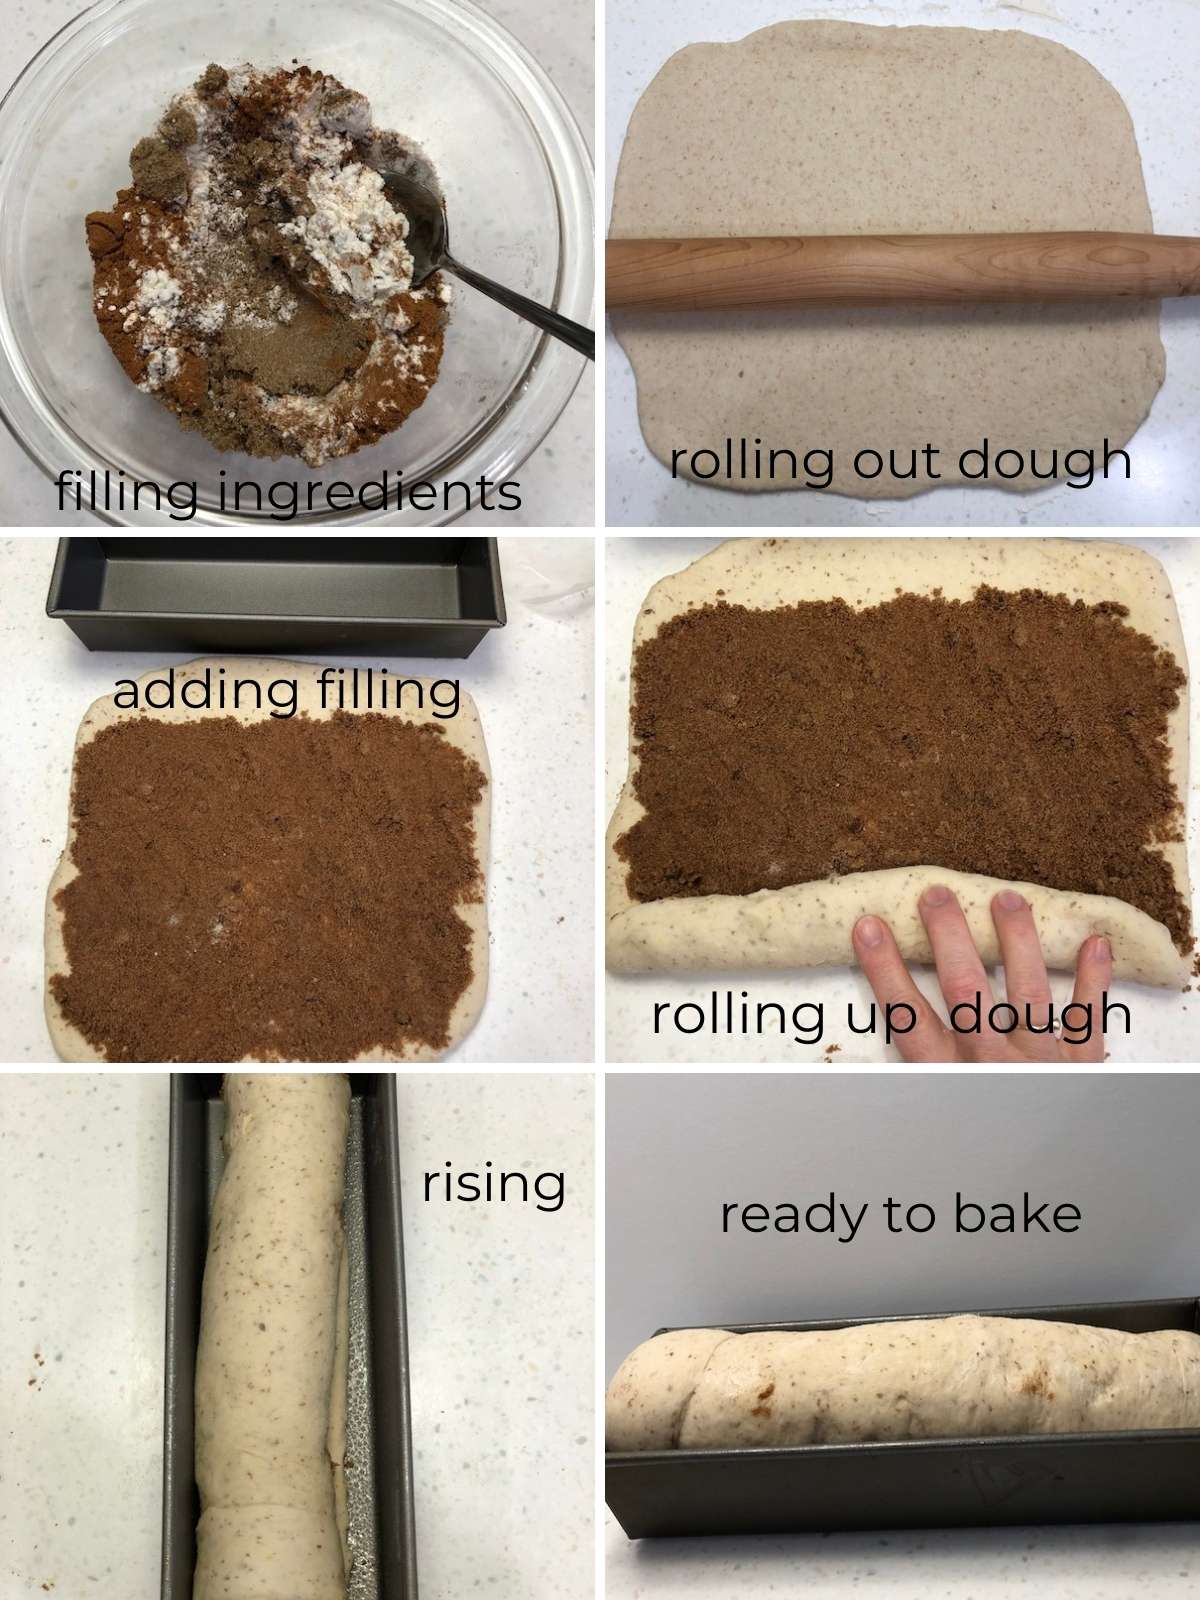
Make Cinnamon Bread!
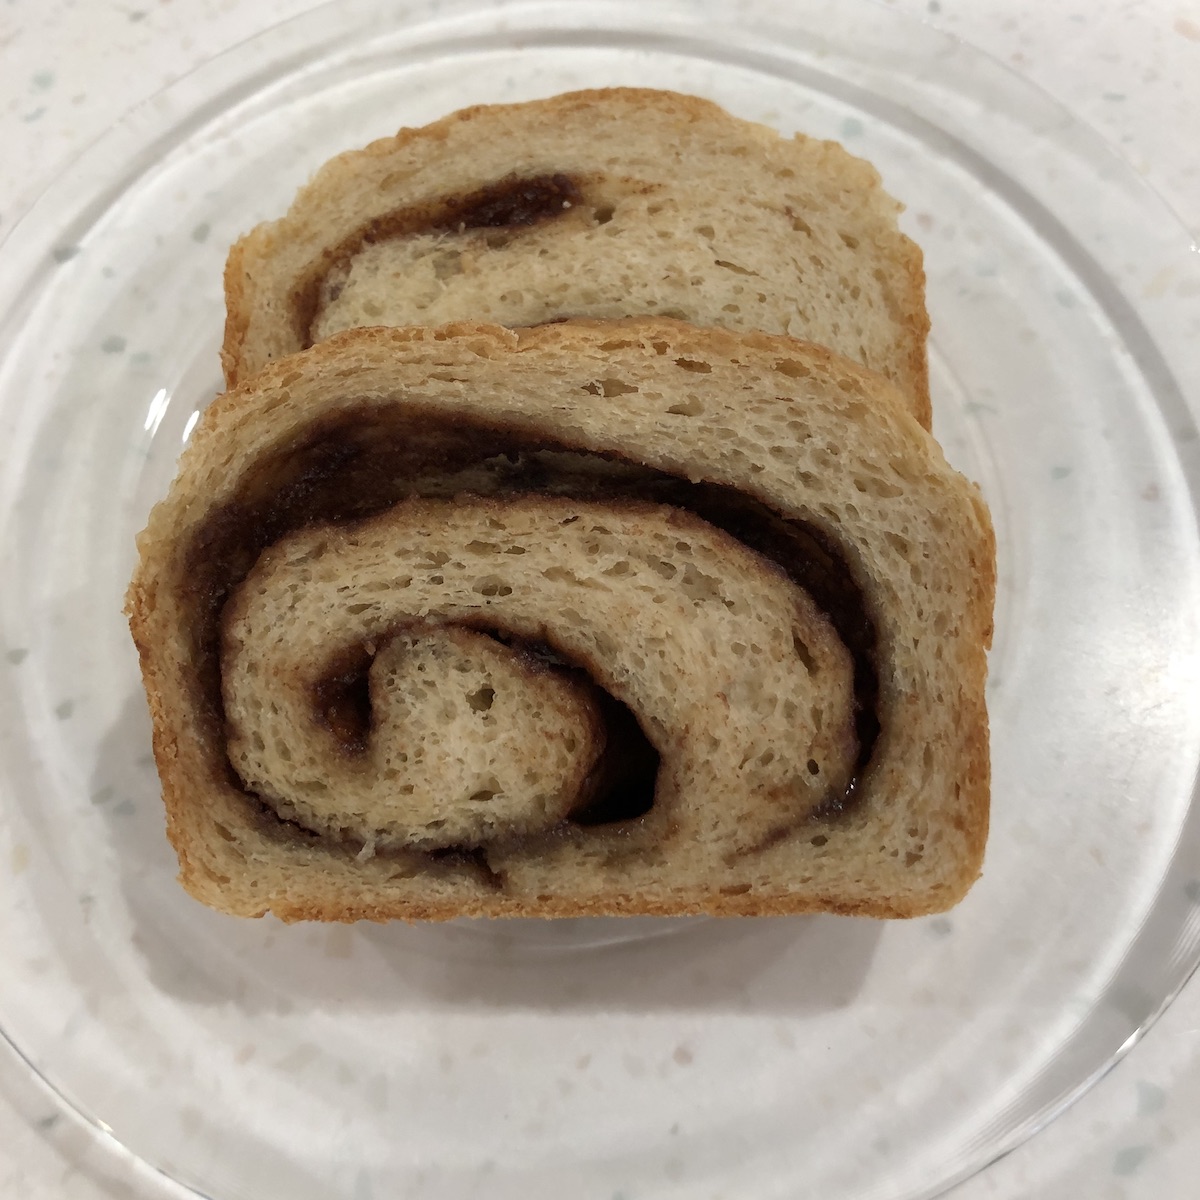
This dough makes amazing cinnamon bread!! When the dough is complete, roll it into a rectangle with one side the size of your loaf pan (I use a longer loaf pan for this.) Spread this filling from King Arthur on the dough, leaving a one inch strip without filling. Roll it up, starting at the end with filling. Place the dough roll in the pan and let rise for 20 minutes. Preheat the oven and let it rise for another 20-30 minutes. Bake as directed – until a thermometer inserted into the loaf registers at least 190 degrees.
In all my testing with vegan milk bread, I only had two bread loaves be less than wonderful. One was because I wanted to take the warm cinnamon loaf to book club. It did not preform well after a several hour rest in the refrigerator. So I recommend baking it without a refrigerator rest. It is wonderful the next day – don’t worry!
My second fail was adding whole grains – but first . . .
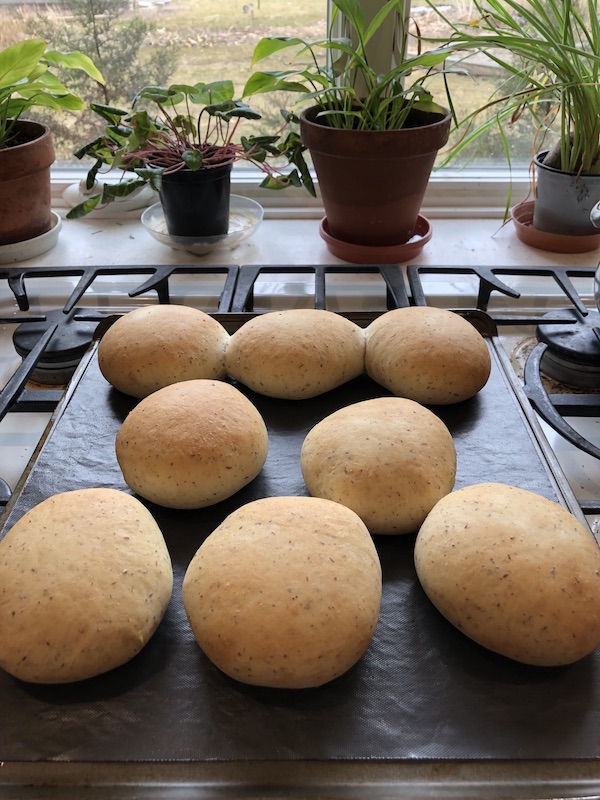
Make Hamburger Buns
I used this dough to shape into hamburger buns. I divided the dough into 8 pieces. Take each piece and shape into a ball by gathering the dough together under the ball (like you are holding onto a balloon stem)
Place the ball stem side down on a lined cookie sheet (parchment or reusable liner). Gently flatten with your hand. Let rest. After you shape each bun and place it on the sheet, gently flatten the previous buns. Soon the buns will resemble hamburger buns.
Cover with a lightly greased plastic wrap and let rise for about 30 minutes. I refrigerated mine for about 2 hours. Bake in a 350 degree oven for 15 minutes. An instant read thermometer inserted into the side (to prevent the top from having holes!) should read 190 degrees.
Don’t Add Whole Grains
I am a huge fan of whole grains. Could I add some to this recipe? I took some quick oats and soaked them in the nut milk to soften them. This bread was very good. It was reminiscent of my favorite oatmeal bread, our everyday bread for years. It had wonderful flavor but it did not have the same texture as vegan milk bread. It did not last well at room temperature. This oatmeal enhanced bread is ok, but I can make a great oatmeal bread with less work!
Did you make Vegan Milk Bread?
Tell me about your vegan milk bread! Did it turn out how you expected? What was your biggest take away? Leave me a comment below!
Vegan Milk Bread without soy
Equipment
- whisk
- rolling pin
- small saucepan
- scale that weighs grams
- bread pan
- instant read thermometer
- heat proof silicone spatula
- aluminum foil
- bread maching or stand mixer optional
- sharp knife or bench knife
Ingredients
Tangzhong
- 43 grams high fat nut milk * (3T.)
- 43 grams water (3T.)
- 14 grams bread flour (2T.)
Bread Dough
- all the tangzhong cooled slightly
- 113 grams high fat nut milk * ½ cup
- 3 tablespoons oil
- 1 tablespoon ground flax seed ** or 3 T aquafaba
- 3 tablespoons water ** omit if using aquafaba
- 3 tablespoons sugar
- ½ teaspoon salt
- 300 grams bread flour (2½ cups)
- 2 tablespoons potato flour ***
- 1 tablespoon instant yeast
Instructions
Make the flax egg (if you are using one.)
- Place 1 tablespoon ground flax in a small bowl.
- Add 3 tablespoon water. Stir.
- Let sit at least 15 minutes, stirring occasionally.
Making the Tangzhong
- Place 43 grams high fat non dairy milk (3 T), 43 grams water (3T) and 14 grams bread flour (2T) in a small saucepan.
- Whisk thoroughly but do not worry too much if a few flour lumps remain.
- Heat over low to medium heat whisking constantly
- Stir until the flour gelatinizes and forms a paste. Your whisk should leave clear streaks in the bottom of the pan. On my gas stove this takes just about 2 minutes. If you have an electric stove, it may take up to 5 minutes.
- Place the tangzhong in a small bowl to cool.
Making the dough
- If you are using a bread machine, be sure to place the ingredients in the pan in the order specified by the manufacturer. This is essential for success.
- If you are using a stand mixer or mixing the dough by hand, combine the non dairy milk, oil, sugar, salt, tangzhong and egg substitute in the mixing bowl.
- Using a dough hook or a sturdy spoon, mix to combine.
- Add the flour, potato flour and yeast. Knead on medium low speed until a smooth elastic dough forms - about 5-10 minutes. If kneading by hand it will take longer.
- The dough should be a little sticky but hold together around your dough hook. If the dough is not soft, but rather stiff and is not at all sticky, add another tablespoon of milk. If it is not coming together but is messy all over the side of the mixing bowl - not just at the bottom- add another tablespoon of flour. Be patient and give it a few minutes to come together.
- When your dough is complete, let it rest covered for 60-90 minutes. It will be puffy but it may or may not double in bulk.
Shaping the Dough
- Place the dough on a floured surface.
- To make traditional Japanese milk bread (Hokkaido), divide into four equal pieces. They should weigh 160-170 grams each.
- On a very lightly floured surface, roll out one piece of dough into a rectangle about 8 inches by 5 inches.
- Fold the dough like a letter - one third into the middle and the other side over the first and set aside. Repeat with the remaining three pieces of dough.
- Take the first piece of dough and on a lightly floured surface roll into a rectangle smaller than the first - about 3 x 6 inches.
- Starting with a short end, roll up the dough. Repeat with the remaining three pieces of dough.
- Place the dough into a lightly greased bread pan. Cover with plastic wrap and let sit at room temperature for 20 minutes.
- Preheat oven to 350 degrees.
- Set a timer for another 20 minutes. After 20 minutes, see if the dough has risen up to the edge of the pan. If so, it is ready to bake. If not, wait 10 more minutes.
Baking the Bread
- Bake in a 350 degree oven for 20 minutes.
- Turn the loaf pan 180 degrees and tent it with aluminum foil to prevent it getting too brown. If you are using aquafaba, the dough tends to brown more quickly so tent after 15 minutes.
- After 10 more minutes (30 minutes total) the bread should be brown and register at least 190 when a digital thermometer is inserted in the middle.
- Take off the foil, take the bread out of the oven and place on a cooling rack.
- After 5-10 minutes, run a knife around the edge of the pan to loosen and remove from pan. Place on rack to cook completely.
- Enjoy!
- Store well wrapped on the counter for up to 5 days. Freeze for longer storage.
Notes
- * If you use a low fat milk alternative (like oat) use 4 tablespoons oil instead of 3
- ** Use either ground flax seed + water or 3 tablespoons aquafaba (not both). See article for more information
- *** Potato flour - you can use a starch like tapioca but the shelf life may not be quite as long. See article for more information.